はじめに
先月、MySQL のリリースモデルの変更が大きなニュースとなったことは MySQL ユーザのみならず耳にしている方も多いのではないでしょうか。
その詳細については、既にアナウンスされた以下の情報や補足記事をご覧いただければと思います。
今回の記事は、MySQL Innovation Release の第一弾となる 8.1.0 で追加された新機能
MySQL InnoDB Cluster Read Replicas
の紹介となります。
機能の概要
その名の通り、 InnoDB Cluster に 非同期レプリケーションのリードレプリカを追加することができる機能です。
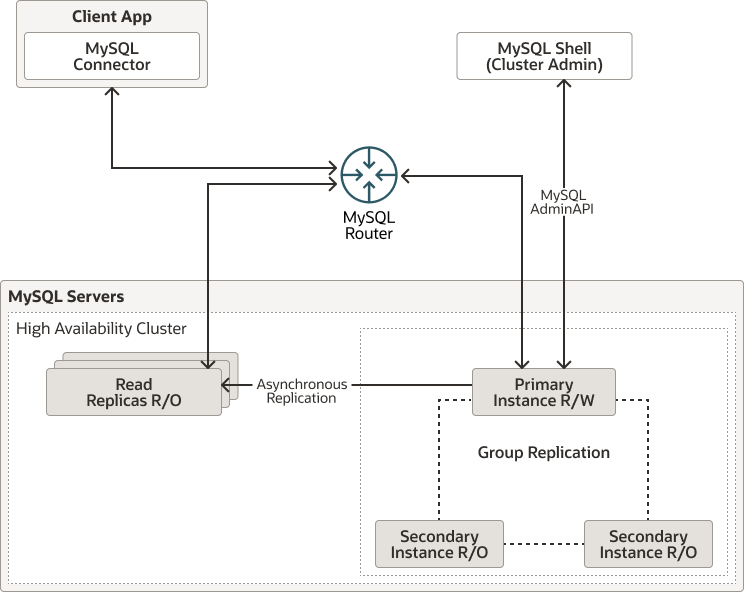
[引用元:https://dev.mysql.com/doc/mysql-shell/8.1/en/mysql-shell-read-replicas.html]
大きな特徴としては、以下が挙げられます。
- ノード追加、削除は MySQL Shell 上から容易に行える。
- InnoDB Cluster のステータスと併せて、リードレプリカの状態も MySQL Shell から統合的に確認できる。
- リードレプリカを InnoDB Cluster セカンダリメンバーに昇格させたり、またその逆も行うことができる。
- MySQL Router の読み取り専用ルーティング対象にリードレプリカを含めることが(リードレプリカのみにすることも)可能。
- レプリケーションソースサーバ(InnoDB Cluster メンバー)がダウンした場合、非同期レプリケーション接続も自動フェイルオーバーする。
MySQL の公式リファレンスマニュアルとしては、InnoDB Cluster 同様、 MySQL Shell のドキュメントに記載があります。
MySQL :: MySQL Shell 8.1 :: 10 MySQL InnoDB Cluster Read Replicas
構成条件について
InnoDB Cluster Read Replicas を構成するための大前提は MySQL Shell 8.1 を使用することですが、それ以外に対象となる MySQL についての諸条件が MySQL Shell リファレンスマニュアルの以下のページに列挙されています。
MySQL :: MySQL Shell 8.1 :: 10.1 Prerequisites
- スタンドアロンの MySQL サーバであること
- MySQL Server のバージョンは 8.0.23 以上であること
- DB インスタンス(InnoDB Cluster メンバー, リードレプリカ)が 8.1 である必要はありません。
- unmanaged なレプリケーションチャネルが設定されていないこと
- ※ユーザーが手動で作成したレプリケーションチャネルのことを指します。
- クラスタを管理するために使用されるものと同じ認証情報を使用する必要があります。
- ※InnoDB Cluster 管理者ユーザアカウント
- インスタンスのserver_idとserver_uuidは、トポロジー内で一意であること
- ※MySQL Shell のマニュアルには記載ないが、MySQL Shell API リファレンス側に記載あり
あと、上記のマニュアルに明記されていませんが MySQL Router も 8.1 を使用する必要があります。
MySQL Router Release Notes / Changes in MySQL Router 8.1.0 (2023-07-18, Innovation Release)
MySQL Router supports InnoDB Cluster Read Replicas.
MySQL Router reads the values defined in the metadata field, v2_router_options.router_options.read_only_targets, to retrieve routing information for read-only traffic.
(…)
実機検証してみる
今回使用した環境
元々存在していた バージョン 8.0.33 の InnoDB Cluster に 同一バージョンのリードレプリカを追加することとしました。
-
MySQL InnoDB Cluster
- Ver 8.0.33 for Linux on x86_64 (MySQL Community Server – GPL)
- 3 ノード, シングルプライマリーモード
- OS : RHEL 8.6
-
MySQL Server(リードレプリカ用)
- Ver 8.0.33 for Linux on x86_64 (MySQL Community Server – GPL)
- OS : RHEL 8.6
-
MySQL Shell
- Ver 8.1.1 for Linux on x86_64 – for MySQL 8.1.0 (MySQL Community Server (GPL))
- OS : RHEL 8.6
-
MySQL Router
- Ver 8.1.0 for Linux on x86_64 (MySQL Community – GPL)
- OS : RHEL 8.6
MySQL Shell 8.1 のインストール
まずは YUM リポジトリを更新(またはインストール)します。
|
1 2 3 |
[root@ss_gr_mysql_01 ~]# dnf install -y https://repo.mysql.com/get/mysql80-community-release-el8-7.noarch.rpm or [root@ss_gr_mysql_01 ~]# dnf update -y mysql80-community-release |
MySQL Shell 8.1 は mysql-tools-innovation-community から入手できますので、当該リポジトリを有効化しましょう。
|
1 2 3 4 5 6 7 8 9 |
[root@ss_gr_mysql_01 ~]# dnf config-manager --enable mysql-tools-innovation-community [root@ss_gr_mysql_01 ~]# dnf list --showduplicate mysql-shell Available Packages (...) mysql-shell.x86_64 8.0.33-1.el8 mysql-tools-community mysql-shell.x86_64 8.0.34-1.el8 mysql-tools-community mysql-shell.x86_64 8.1.0-1.el8 mysql-tools-innovation-community mysql-shell.x86_64 8.1.1-1.el8 mysql-tools-innovation-community |
8.1 が選択可能になりました。
この環境ではすでに MySQL Shell 8.0.33 をインストール済みでしたのでアップグレードします。
|
1 2 3 |
[root@ss_gr_mysql_01 ~]# dnf update -y mysql-shell-8.1.1 [root@ss_gr_mysql_01 ~]# mysqlsh --version mysqlsh Ver 8.1.1 for Linux on x86_64 - for MySQL 8.1.0 (MySQL Community Server (GPL)) |
MySQL Router 8.1 へのアップグレード
MySQL Router 8.1 も mysql-tools-innovation-community から入手できます。
上記手順を MySQL Router インストールサーバで実行してリポジトリを有効にしておき、MySQL Router 8.1 をインストール(またはアップグレード)しましょう。
|
1 2 3 |
[root@ss_router_mysql_01 ~]# dnf update -y mysql-router-community-8.1.0 [root@ss_router_mysql_01 ~]# mysqlrouter --version MySQL Router Ver 8.1.0 for Linux on x86_64 (MySQL Community - GPL) |
クラスタメタデータ のアップグレード
MySQL Shell 8.1 を使用するには、クラスタメタデータのアップグレード(2.1.0 から 2.2.0)が必要です。
※そのまま MySQL Shell を使用すると以下のメッセージが表示されます。
NOTE: The installed metadata version 2.1.0 is lower than the version required by Shell which is version 2.2.0. It is recommended to upgrade the metadata. See \? dba.upgradeMetadata for additional details.
dba.upgradeMetadata() を実行しましょう。
|
1 2 3 4 5 6 7 8 9 10 11 12 13 14 15 16 17 |
MySQL localhost JS > dba.upgradeMetadata() Metadata Schema Upgrade The topology you are connected to is using an outdated metadata schema version 2.1.0 and needs to be upgraded to 2.2.0. Without doing this upgrade, no AdminAPI calls except read only operations will be allowed. The grants for the MySQL Router accounts that were created automatically when bootstrapping need to be updated to match the new metadata version's requirements. NOTE: No automatically created Router accounts were found. WARNING: If MySQL Routers have been bootstrapped using custom accounts, their grants can not be updated during the metadata upgrade, they have to be updated using the setupRouterAccount function. For additional information use: \? setupRouterAccount Upgrading metadata at 'ss_gr_mysql_01:3306' from version 2.1.0 to version 2.2.0. Creating backup of the metadata schema... Step 1 of 1: upgrading from 2.1.0 to 2.2.0... Removing metadata backup... Upgrade process successfully finished, metadata schema is now on version 2.2.0 |
インスタンスの事前構成
本機能を使用してリードレプリカを追加する際に、 InnoDB Cluster にノード追加する際と同じ互換性チェックが行われます。
つまり、 InnoDB Cluster としてメンバー追加可能なようにパラメータであったりクラスタ管理者の認証情報が整合している必要があります。
ですので InnoDB Cluster 構成時と同じように事前に追加するリードレプリカ上で dba.checkInstanceConfiguration() または dba.configureInstance() を実行しておきましょう。
以下は dba.configureInstance() の実行例です。
|
1 2 3 4 5 6 7 8 9 |
[root@ss_rep_mysql_01 ~]# mysqlsh root@localhost:3306 MySQL localhost JS > dba.configureInstance("root:password@localhost:3306", { "clusterAdmin": "icadmin", "clusterAdminPassword: "password", "interactive": 0, "restart": 1 } ); |
あとは、 InnoDB Cluster と同様、追加するリードレプリカの IPアドレスを名前解決できるように /etc/hosts ファイルに追加しておくなどで対応しておきます。
Read Replicas の作成
ではいよいよリードレプリカを追加してみます。
事前準備が済んでいれば、 Cluster.addReplicaInstance() という API コマンドを実行するだけで冒頭の特徴でも述べた通り簡単に追加することができます。
MySQL Shell API: MySQL Shell API
InnoDB Cluster メンバー上で MySQL Shell にてクラスタ管理者でログインします。
以下は、 ss_rep_mysql_01 というリードレプリカを、InnoDB Cluster プライマリーノードをレプリケーションソースとしてクラスタに追加するコマンドの例です。
|
1 2 3 4 5 6 7 8 9 10 |
[root@ss_gr_mysql_01 ~]# mysqlsh icadmin@localhost:3306 MySQL localhost JS > cluster=dba.getCluster() <Cluster:test_cluster> MySQL localhost JS > cluster.addReplicaInstance( 'ss_rep_mysql_01:3306', { label: 'RReplica-01', replicationSources: 'primary', recoveryMethod: 'clone' } ) |
指定可能なすべてのオプションは MySQL Shell API リファレンスでご確認ください。
MySQL Shell API: Cluster Class Reference
labelは追加する Read Replicas インスタンスの識別子ラベル名で、cluster.status()およびcluster.description()の出力で使用されます。label指定無しの場合、識別子はhostname:portが表示されます。
recoveryMethodはcloneかincrementalが選択可能です。デフォルトはautoです。cloneDonorでクローン元を指定することも可能です。
その他、timeout や dryRun もあり、InnoDB Cluster の cluster.addInstance() と同じ感覚で使用できます。
replicationSourcesで指定できるパターンは以下の通りです。primary- プライマリーノードがフェイルオーバするたびにレプリケーション接続が追随します。
secondary- セカンダリーノードが存在する限りはセカンダリノードをレプリケーションソースとするように接続フェイルオーバーします。
- セカンダリーノードが存在し無くなった場合、(最後に残っている)プライマリーノードに接続フェイルオーバーします。
hostname:port- 特定のノードのみをレプリケーションソースとします。
[hostname:port, hostname:port, ...]- カンマ区切りでリストすることで、先頭から順にレプリケーションソースとします。
レプリケーションソースの設定はリードレプリカごとに設定できるので、システムの運用に合わせて柔軟なトポロジー構成が組めますね。
状態確認
cluster.addReplicaInstance() を実行すると以下のように(この例ではクローニングで)リードレプリカが追加されました。
|
1 2 3 4 5 6 7 8 9 10 11 12 13 14 15 16 17 18 19 20 21 22 23 24 25 26 27 28 29 30 31 32 33 34 |
Setting up 'ss_rep_mysql_01:3306' as a Read Replica of Cluster 'test_cluster'. Validating instance configuration at ss_rep_mysql_01:3306... This instance reports its own address as ss_rep_mysql_01:3306 Instance configuration is suitable. * Checking transaction state of the instance... Clone based recovery selected through the recoveryMethod option Monitoring Clone based state recovery of the new member. Press ^C to abort the operation. Clone based state recovery is now in progress. NOTE: A server restart is expected to happen as part of the clone process. If the server does not support the RESTART command or does not come back after a while, you may need to manually start it back. * Waiting for clone to finish... NOTE: ss_rep_mysql_01:3306 is being cloned from ss_gr_mysql_01:3306 ** Stage DROP DATA: Completed ** Clone Transfer FILE COPY ############################################################ 100% Completed PAGE COPY ############################################################ 100% Completed REDO COPY ############################################################ 100% Completed * Clone process has finished: 73.69 MB transferred in about 1 second (~73.69 MB/s) * Configuring Read-Replica managed replication channel... ** Changing replication source of ss_rep_mysql_01:3306 to ss_gr_mysql_01:3306 * Waiting for Read-Replica 'ss_rep_mysql_01:3306' to synchronize with Cluster... ** Transactions replicated ############################################################ 100% 'ss_rep_mysql_01:3306' successfully added as a Read-Replica of Cluster 'test_cluster'. |
上記から、クローン元(ドナー)は ss_gr_mysql_01:3306(プライマリーノード) が自動選択されました。
オンラインで追加する際は、サービスに影響を与えないようにセカンダリーノードを明示的にドナーにすると良いと思います。
リードレプリカを追加すると、クラスター内にリードレプリカ用のユーザが自動追加されました。
|
1 2 3 4 5 6 7 8 9 10 11 12 13 14 15 16 |
MySQL localhost JS > \sql select user,host from mysql.user; +-------------------------+-----------+ | user | host | +-------------------------+-----------+ | icadmin | % | | mysql_innodb_cluster_11 | % | | mysql_innodb_cluster_12 | % | | mysql_innodb_cluster_13 | % | | mysql_innodb_replica_14 | % | <-- レプリケーション用ユーザが追加された | router_user | % | | mysql.infoschema | localhost | | mysql.session | localhost | | mysql.sys | localhost | | root | localhost | +-------------------------+-----------+ 10 rows in set (0.0006 sec) |
リードレプリカからおなじみの SHOW REPLICA STATUS コマンドでレプリケーション状態を確認してみましょう。
バイナリログやリレーログも独自設定されたようです。
|
1 2 3 4 5 6 7 8 9 10 11 12 13 14 15 16 17 18 19 20 21 22 23 24 25 |
*************************** 1. row *************************** Replica_IO_State: Waiting for source to send event Source_Host: ss_gr_mysql_01 Source_User: mysql_innodb_replica_14 Source_Port: 3306 Connect_Retry: 3 Source_Log_File: binlog.000005 Read_Source_Log_Pos: 133771 Relay_Log_File: ss_rep_mysql_01-relay-bin-read_replica_replication.000002 Relay_Log_Pos: 3563 Relay_Source_Log_File: binlog.000005 Replica_IO_Running: Yes Replica_SQL_Running: Yes Replicate_Do_DB: (...) Auto_Position: 1 Replicate_Rewrite_DB: Channel_Name: read_replica_replication Source_TLS_Version: Source_public_key_path: Get_Source_public_key: 0 Network_Namespace: 1 row in set (0.00 sec) |
このレプリケーションチャネルは InnoDB Cluster による managed な接続となります。
クラスタの状態確認は、 InnoDB Cluster と同じ API コマンド cluster.status() で確認できます。
レプリケーションソースとなるメンバーノードの情報の配下に追加表示されるかたちです。
|
1 2 3 4 5 6 7 8 9 10 11 12 13 14 15 16 17 18 19 20 |
MySQL localhost JS > cluster.status() (...) "topology": { "ss_gr_mysql_01:3306": { (...) "readReplicas": { "RReplica-01": { "address": "ss_rep_mysql_01:3306", "role": "READ_REPLICA", "status": "ONLINE", "version": "8.0.33" } }, (...) |
cluster.status() の extended オプションのパラメータによって表示内容が変わってきます。
1以上では replicationLag(レプリケーション遅延秒数)を確認することができます。
Read Replicas の削除
リードレプリカのノード削除も簡単で、 InnoDB Cluster と同じコマンドである cluster.removeInstance() を使用します。
|
1 2 3 4 5 6 7 8 9 10 |
MySQL localhost JS > cluster.removeInstance("ss_rep_mysql_01:3306") Removing Read-Replica 'ss_rep_mysql_01:3306' from the Cluster 'test_cluster'. * Waiting for the Read-Replica to synchronize with the Cluster... ** Transactions replicated ############################################################ 100% * Stopping and deleting the Read-Replica managed replication channel... Read-Replica 'ss_rep_mysql_01:3306' successfully removed from the Cluster 'test_cluster'. |
追加されたレプリケーション用ユーザが削除され、またクラスタメタデータ上からリードレプリカが削除されます。
まとめ
今回の記事では、 MySQL InnoDB Cluster Read Replicas の紹介としまして、概要やノード追加・削除の方法を見てみました。
InnoDB Cluster と統合することで手軽に操作や管理ができるようになる上に、非同期レプリケーション接続の自動フェイルオーバーによってリードレプリカの可用性まで高めることができる非常にお勧めの機能と言えます。
本記事ではお伝えしきれなかった以下の内容については次回掲載予定ですので、そちらも続けてご覧いただければと思います。
- 非同期レプリケーションの自動フェイルオーバー機能について
- MySQL Router – リードレプリカへのルーティングポリシー設定について

