以前弊社でもご紹介させていただいたOrchestratorはMySQLやMariaDBのための高可用性ソフトウェアです。
Orchestratorでレプリケーション環境のHAを実現しよう
OrchestratorはMySQLのレプリケーショントポロジを理解し、マスタのフェイルオーバ、スイッチオーバや、スレーブの組み換えを行う事が可能です。
一方でアプリケーションからの負荷分散や、ルーティング先の切り替え等の機能は提供されません。
それらの機能をアプリケーションから透過的に実現するためにはプロキシソフトウェアを使用する事が一般的です。
ProxySQLはMySQL Protocolを理解し、シンプルな負荷分散からルールベースのクエリルーティング等非常に多機能で、MySQLとの相性はバッチリですが、レプリケーション構成におけるフェイルオーバ機能などは実装されていませんでした。
今回は、OrchestratorとProxySQLを使用して障害発生時に対応した環境を構築しました。
環境
| サーバ名 | ソフトウェア |
|---|---|
| mysql1 | MySQL 8.0.16(master) |
| mysql2 | MySQL 8.0.16(slave) |
| mysql3 | MySQL 8.0.16(slave) |
| proxysql1 | ProxySQL 2.0.4 |
| orchestrator1 | Orchestrator 3.0.14 |
OSはCentOS7です。
Orchestrator用バックエンドDBの設定
Orchestratorは監視データのリポジトリとしてMySQL(MariaDB) or SQLITE3のいずれかが必要ですのでOrchestratorと同じホストにMariaDBをインストールしました。
|
1 2 3 4 5 6 7 |
orchestrator1$ yum -y install mariadb-server orchestrator1$ systemctl start mariadb orchestrator1$ mysql <<-EOS create database if not exists orchestrator; create user orc_server_user@localhost identified by 'orc_server_password'; grant all on *.* to orc_server_user@localhost; EOS |
特にMariaDBである必要はありません。
Orchestratorはcaching_sha2_passwordに未対応ですので、MySQL8.0以降ではorchestratorからの接続ユーザは mysql_native_password を使用するようにご注意ください。
|
1 |
create user orchestrator identified with mysql_native_password by 'Orch_backend_passw0rd'; |
validate password pluginの都合上Passwordをあわせています。
上記を行う場合は後述するOrchestaratorの設定ファイル上も適切に合わせて下さい。
Orchestratorの設定
以下の通りOrchestratorを設定します
|
1 2 3 4 |
orchestrator1$ curl -s https://packagecloud.io/install/repositories/github/orchestrator/script.rpm.sh | sudo bash orchestrator1$ yum -y install epel-release orchestrator1$ yum -y install orchestrator orchestrator1$ cp -pi {/usr/local/orchestrator/orchestrator-sample,/etc/orchestrator}.conf.json |
/etc/orchestrator.conf.json は以下の箇所を編集します
|
1 2 3 4 5 6 |
"RecoverMasterClusterFilters": [ "*" ], "RecoverIntermediateMasterClusterFilters": [ "*" ], |
起動します。
|
1 2 3 |
orchestrator1$ service orchestrator start orchestrator1$ service orchestrator status Checking orchestrator... Running |
バックエンドDBへの接続に問題がある場合、startはOkとなりますが実際にはプロセスは停止するという事がありましたので、必ず起動後はstatusをご確認ください。
|
1 2 3 4 |
orchestrator1$ service orchestrator start Starting orchestrator... Ok orchestrator1$ service orchestrator status Checking orchestrator... Process dead but pidfile exists |
上記の設定はデフォルトのユーザを使い、最低限の設定を行った状態です。
ターゲットデータベースの構築
今回はMySQLでGTIDを有効化した環境を構築します。
すべてを解説はしませんが、必要に応じてマニュアルをご確認ください。
以下はすべてのサーバで実施します
|
1 2 3 4 5 6 7 8 9 10 11 12 13 14 15 16 17 18 19 20 21 22 23 24 25 26 |
mysql1,2,3$ yum -y install https://dev.mysql.com/get/mysql80-community-release-el7-1.noarch.rpm mysql1,2,3$ yum -y install mysql-community-{server,client,libs,libs-compat,devel,test} mysql1,2,3$ cat > /etc/my.cnf <<-EOF [mysqld] user = mysql port = 3306 datadir = /var/lib/mysql socket = mysql.sock server_id = 1 # すべてのサーバで異なる値に変更します log_bin binlog_format = ROW bind_address = 0.0.0.0 master-info-repository = table relay-log-info-repository = table gtid_mode = ON log-slave-updates enforce-gtid-consistency log_error = /var/log/mysqld.log report_host = $(uname -n) report_port = 3306 max_connect_errors = 18446744073709551615 EOF mysql1,2,3$ systemctl start mysqld.service mysql1,2,3$ mysql --connect-expired-password -uroot -p"$(grep password /var/log/mysqld.log | rev | cut -d ' ' -f 1 | rev)" -e "set password = 'MySQL8.0'" mysql1,2,3$ mysql -uroot -p'MySQL8.0' -e 'UNINSTALL COMPONENT "file://component_validate_password"' mysql1,2,3$ mysql -uroot -p'MySQL8.0' -e 'reset master' |
設定ファイルのパラメータでレプリケーション関連以外では以下を変更しています。
| パラメータ名 | 説明 |
|---|---|
| report_host | orchestratorはマスタに接続しているスレーブのホスト名をサンプル設定では show slave statusから取得します。そのため、全サーバで設定します。 |
| report_port | report_hostと同様の理由により、設定します |
| max_connect_errors | Orchestratorのハートビートの失敗による接続ブロックを回避するために値を引き上げます |
マスタでOrchestratorに必要なユーザを作成します。
ユーザ名、パスワードは /usr/local/orchestrator/orchestrator-sample,json.cnf に合わせています。
|
1 2 3 4 5 6 |
mysql1$ ( echo 'create user rep identified by "MySQL8.0";' echo 'grant replication slave on *.* to rep;' echo 'create user orc_client_user identified with mysql_native_password by "orc_client_password";' echo 'GRANT SUPER, PROCESS, REPLICATION SLAVE, REPLICATION CLIENT, RELOAD ON *.* TO orc_client_user;' ) | mysql -uroot -p'MySQL8.0' |
同様にマスタでProxySQL用ユーザを作成します。
監視用(monitor)、アプリ用(app_user)となります。
|
1 2 3 4 5 6 |
mysql1$ ( echo 'create user monitor identified with mysql_native_password by "MySQL8.0";' echo 'GRANT replication client ON *.* to monitor;' echo 'create user app_user identified with mysql_native_password by "MySQL8.0";' echo 'GRANT all on *.* to app_user;' ) | mysql -uroot -p'MySQL8.0' |
スレーブでレプリケーションを開始します
|
1 2 3 4 5 |
mysql1$ ( echo 'change master to master_host = "mysql1", master_user = "rep" , master_password = "MySQL8.0", master_auto_position = 1;' echo 'start slave;' echo 'set global read_only = 1;' ) | mysql -uroot -p'MySQL8.0' |
ProxySQLの設定
ProxySQLのオフィシャルの手順を参考にインストールを行い、起動、接続します。
|
1 2 3 4 |
proxysql1$ yum install https://github.com/sysown/proxysql/releases/download/v2.0.4/proxysql-2.0.4-1-centos7.x86_64.rpm proxysql1$ service proxysql start proxysql1$ mysql -u admin -padmin -h 127.0.0.1 -P6032 --prompt='Admin> ' Admin> exit |
ターゲットであるMySQLサーバ等の設定をProxySQLに行います。
最低限以下を行います
- ターゲットサーバの登録(mysql_servers)
- レプリケーション監視の有効化(mysql_replication_hostgroups)
- 監視ユーザの認証情報の設定(mysql-monitor_username, mysql-monitor_password)
- 接続用ユーザ登録(mysql_users)
- READ/WRITE ルーティング設定(mysql_query_rulees)
|
1 2 3 4 5 6 7 8 9 10 11 12 13 14 15 16 |
proxysql1$ mysql -u admin -padmin -h 127.0.0.1 -P6032 <<-EOS INSERT INTO mysql_servers (hostgroup_id, hostname) VALUES (0, "mysql1"), (0, "mysql2"), (0, "mysql3"); INSERT INTO mysql_replication_hostgroups (writer_hostgroup ,reader_hostgroup) values (0,1); UPDATE global_variables SET variable_value='monitor' WHERE variable_name='mysql-monitor_username'; UPDATE global_variables SET variable_value='MySQL8.0' WHERE variable_name='mysql-monitor_password'; INSERT INTO mysql_users (username, password, active, default_hostgroup) VALUES ('app_user', 'MySQL8.0', 1, 0); INSERT INTO mysql_query_rules ( rule_id, active, match_pattern, destination_hostgroup ) values (1, 1, "^SELECT FOR UPDATE.*", 0), (2, 1, "^SELECT .*", 1); LOAD MYSQL USERS TO RUNTIME; SAVE MYSQL USERS TO DISK; LOAD MYSQL QUERY RULES TO RUNTIME; SAVE MYSQL QUERY RULES TO DISK; LOAD MYSQL SERVERS TO RUNTIME; SAVE MYSQL SERVERS TO DISK; LOAD MYSQL VARIABLES TO RUNTIME; SAVE MYSQL VARIABLES TO DISK; EOS |
なお今回は検証という事で簡単なルーティング設定を行っていますが、実際に導入する場合は個々のSQLのdigest値をもとに厳密なルーティング設定を行う事が推奨されています。
https://proxysql.com/blog/configure-read-write-split
テスト接続用のMySQL Clientのインストールと設定を行います。
|
1 2 3 4 |
proxysql1$ yum -y install https://dev.mysql.com/get/mysql80-community-release-el7-1.noarch.rpm proxysql1$ yum -y install mysql-community-client proxysql1$ mysql_config_editor set --login-path=app -uapp_user -p -h127.0.0.1 -P6033 ※パスワードを入力 |
設定が完了したら簡単なテストを行います。
|
1 2 3 4 5 6 7 8 9 10 11 12 |
# READはすべてのサーバにルーティング proxysql1$ seq 10 | while read no;do mysql --login-path=app -NB -e "select @@hostname";done mysql1 mysql2 mysql3 : # WRITE(及びトランザクション)はマスタにルーティング proxysql1$ seq 10 | while read no;do mysql --login-path=app -NB -e "begin;select @@hostname";done mysql1 mysql1 mysql1 : |
Orchestratorにターゲットサーバを登録
orchestratorでdiscoverコマンドをを実行しmysql1(マスタ)を登録します。
|
1 2 3 4 5 6 |
orchestrator1$ /usr/local/orchestrator/orchestrator -c discover -i mysql1:3306 mysql1:3306 orchestrator1$ # /usr/local/orchestrator/orchestrator -c topology -i mysql1 mysql1:3306 [0s,ok,8.0.16,rw,ROW,>>,GTID] + mysql2:3306 [0s,ok,8.0.16,ro,ROW,>>,GTID] + mysql3:3306 [0s,ok,8.0.16,ro,ROW,>>,GTID] |
※debug: trueが設定ファイルで設定されているため、ログが実際には出力されますが見やすさのために省略しています
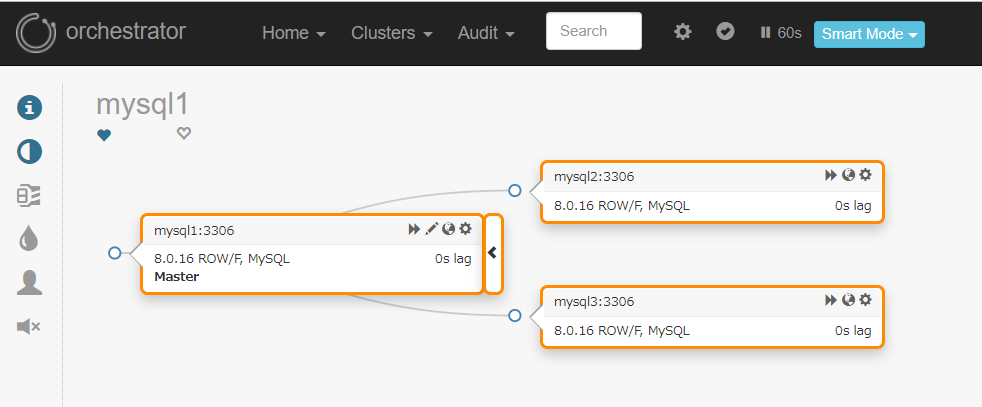
topologyで確認した結果の通り、Orchestratorはすべてのスレーブを自動的に認識しています。
Webインタフェースからも登録されていることが確認できます
フェイルオーバテスト
今回はREAD/WRITEの処理を0.3秒間隔で繰り返し、マスタを停止した場合の動作を確認します。
WRITEのためのテスト用にターゲットにテーブルを作成します。
|
1 2 3 4 |
mysql1$ mysql mysql> CREATE DATABASE IF NOT EXISTS test; mysql> DROP TABLE IF EXISTS test.write_test; mysql> CREATE TABLE test.write_test (no int primary key auto_increment, hostname varchar(100), insert_time datetime); |
READの接続は以下のように実施します
|
1 2 3 |
proxysql1$ while :;do mysql --login-path=app -NB -e "select @@hostname, now()";sleep 0.3;done mysql1 2019-06-17 10:38:32 : |
WRITEの接続は以下のように実施します
|
1 2 3 4 5 6 7 8 9 |
proxysql1$ sql="begin;" proxysql1$ sql="${sql}set @now=now();" proxysql1$ sql="${sql}insert into test.write_test (hostname,insert_time) values (@@hostname, @now);" proxysql1$ sql="${sql}insert into test.write_test (hostname,insert_time) values (@@hostname, @now);" proxysql1$ sql="${sql}select * from test.write_test where insert_time=@now;" proxysql1$ sql="${sql}commit" proxysql1$ while :;do mysql --login-path=app -NB -e "${sql}";sleep 0.3;done mysql1 2019-06-17 10:39:01 : |
マスタを停止します。
10:51:01にコマンドを実行し、完全に停止したのは10:51:11付近です。
|
1 2 3 4 |
mysql1$ date; systemctl stop mysqld 2019年 6月 17日 月曜日 10:51:01 UTC 2019-06-17T10:51:11.338513Z 0 [System] [MY-010910] [Server] /usr/sbin/mysqld: Shutdown complete (mysqld 8.0.16) MySQL Community Server - GPL. |
READ処理については即時にマスタがルーティング先から切り離されました。
|
1 2 3 4 5 6 7 8 9 10 11 12 13 14 15 16 17 18 19 20 21 22 23 24 25 26 27 28 29 30 31 32 33 34 |
mysql3 2019-06-17 10:51:01 : mysql1 2019-06-17 10:51:02 mysql3 2019-06-17 10:51:02 mysql3 2019-06-17 10:51:03 mysql2 2019-06-17 10:51:03 mysql2 2019-06-17 10:51:03 mysql2 2019-06-17 10:51:04 mysql3 2019-06-17 10:51:04 mysql3 2019-06-17 10:51:04 mysql2 2019-06-17 10:51:05 mysql2 2019-06-17 10:51:05 mysql3 2019-06-17 10:51:05 mysql3 2019-06-17 10:51:05 mysql2 2019-06-17 10:51:06 mysql3 2019-06-17 10:51:06 mysql3 2019-06-17 10:51:06 mysql2 2019-06-17 10:51:07 mysql2 2019-06-17 10:51:07 mysql3 2019-06-17 10:51:07 mysql2 2019-06-17 10:51:08 mysql3 2019-06-17 10:51:08 mysql3 2019-06-17 10:51:08 mysql3 2019-06-17 10:51:09 mysql2 2019-06-17 10:51:09 mysql3 2019-06-17 10:51:09 mysql3 2019-06-17 10:51:10 mysql2 2019-06-17 10:51:10 mysql3 2019-06-17 10:51:10 mysql2 2019-06-17 10:51:11 mysql2 2019-06-17 10:51:11 mysql3 2019-06-17 10:51:11 mysql3 2019-06-17 10:51:11 mysql3 2019-06-17 10:51:12 |
WRITE処理については一部のクエリはエラーが返りましたが、10秒程度で復旧しています。
|
1 2 3 4 5 |
613 mysql1 2019-06-17 10:51:01 ERROR 2013 (HY000) at line 1: Lost connection to MySQL server during query ERROR 2013 (HY000) at line 1: Lost connection to MySQL server at 'handshake: reading inital communication packet', system error: 107 614 mysql2 2019-06-17 10:51:14 : |
mysql2(新マスタ)ではread_onlyが解除されました。
|
1 2 3 4 5 6 |
mysql2> select @@read_only; +-------------+ | @@read_only | +-------------+ | 0 | +-------------+ |
Orchestrator視点
Orchestratorのログは /var/log/orchestrator.log です。
ログが多いため特筆すべき行の抜粋となります。
|
1 2 3 4 5 6 7 8 9 10 11 12 13 14 15 16 17 18 19 20 21 22 23 24 25 26 27 28 29 30 31 32 33 34 35 36 37 38 39 40 41 42 43 |
2019-06-17 10:51:03 ERROR Error 1053: Server shutdown in progress # 最初のエラー : : # この間はスレーブの状態チェックや停止したマスタの自動リカバリ等の処理を行っています : # mysql1がDeadMasterと判断されリカバリ処理を試みています # フェイルオーバ前後にはhookが動作します 2019-06-17 10:51:11 INFO auditType:recover-dead-master instance:mysql1:3306 cluster:mysql1:3306 message:problem found; will recover : 2019-06-17 10:51:11 INFO topology_recovery: Running PreFailoverProcesses hook 1 of 1: echo 'Will recover from DeadMaster on mysql1:3306' >> /tmp/recovery.log : 2019-06-17 10:51:11 INFO topology_recovery: RecoverDeadMaster: will recover mysql1:3306 2019-06-17 10:51:11 INFO topology_recovery: RecoverDeadMaster: masterRecoveryType=MasterRecoveryGTID 2019-06-17 10:51:11 INFO topology_recovery: RecoverDeadMaster: regrouping replicas via GTID : # スレーブの状態が確認され、どちらのスレーブも問題ないと判断されています 2019-06-17 10:51:11 INFO Stopped slave nicely on mysql2:3306, Self:mysql2-bin.000001:133776, Exec:mysql1-bin.000001:137377 2019-06-17 10:51:11 INFO Stopped replication on mysql2:3306, Self:mysql2-bin.000001:133776, Exec:mysql1-bin.000001:137377 2019-06-17 10:51:12 INFO Stopped slave nicely on mysql3:3306, Self:mysql3-bin.000001:133776, Exec:mysql1-bin.000001:137377 2019-06-17 10:51:12 INFO Stopped replication on mysql3:3306, Self:mysql3-bin.000001:133776, Exec:mysql1-bin.000001:137377 : # mysql2がpromote(昇格)対象と判断されました # mysql3はmysql2のスレーブに移動されます 2019-06-17 10:51:12 INFO topology_recovery: RecoverDeadMaster: promotedReplicaIsIdeal(mysql2:3306) 2019-06-17 10:51:12 INFO moveReplicasViaGTID: Will move 1 replicas below mysql2:3306 via GTID 2019-06-17 10:51:12 INFO Will move mysql3:3306 below mysql2:3306 via GTID 2019-06-17 10:51:12 INFO auditType:begin-maintenance instance:mysql3:3306 cluster:mysql1:3306 message:maintenanceToken: 1, owner: orchestrator1, reason: move below mysql2:3306 2019-06-17 10:51:12 INFO Stopped replication on mysql3:3306, Self:mysql3-bin.000001:133776, Exec:mysql1-bin.000001:137377 2019-06-17 10:51:12 INFO ChangeMasterTo: Changed master on mysql3:3306 to: mysql2:3306, mysql2-bin.000001:133776. GTID: true 2019-06-17 10:51:12 INFO Started replication on mysql3:3306 : # mysql2ではレプリケーションが停止されRESET SLAVE ALLが実行されました 2019-06-17 10:51:13 INFO Stopped replication on mysql2:3306, Self:mysql2-bin.000001:133776, Exec:mysql1-bin.000001:137377 2019-06-17 10:51:13 INFO Reset slave mysql2:3306 2019-06-17 10:51:13 INFO auditType:reset-slave instance:mysql2:3306 cluster:mysql1:3306 message:mysql2:3306 replication reset 2019-06-17 10:51:13 INFO auditType:end-maintenance instance:mysql2:3306 cluster:mysql1:3306 message:maintenanceToken: 2 2019-06-17 10:51:13 INFO topology_recovery: - RecoverDeadMaster: applying RESET SLAVE ALL on promoted master: success=true : # read_onlyが解除されました 2019-06-17 10:51:13 INFO instance mysql2:3306 read_only: false 2019-06-17 10:51:13 INFO auditType:read-only instance:mysql2:3306 cluster:mysql1:3306 message:set as false 2019-06-17 10:51:13 INFO topology_recovery: - RecoverDeadMaster: applying read-only=0 on promoted master: success=true 2019-06-17 10:51:13 INFO topology_recovery: Writing KV [mysql/master/mysql1:mysql2:3306 mysql/master/mysql1/hostname:mysql2 mysql/master/mysql1/port:3306 mysql/master/mysql1/ipv4:192.168.121.163 mysql/master/mysql1/ipv6:] : |
ProxySQL視点
こちらも抜粋となります。
Orchestratorによってread_only=0が設定された1秒後にはWriterとして認識され、WRITEに関しての復旧が完了しています。
|
1 2 3 4 5 6 7 8 9 10 11 12 13 14 15 16 17 18 19 20 21 22 23 24 25 26 27 28 29 30 31 32 33 34 35 36 37 38 39 40 41 42 43 44 45 46 47 48 49 |
2019-06-17 10:51:02 MySQL_Session.cpp:3359:handler(): [ERROR] Detected a broken connection during query on (0,mysql1,3306) , FD (Conn:34 , MyDS:34) : 2013, Lost connection to MySQL server during query : # 1秒で5回以上のerrorが発生したため"SHUNNED"のステータスとなっています。"SHUNNED"となったサーバにはそれ以上の接続がルーティングされません 2019-06-17 10:51:02 MySQL_HostGroups_Manager.cpp:886:connect_error(): [ERROR] Shunning server mysql1:3306 with 5 errors/sec. Shunning for 10 seconds # 監視スレッドのREAD_ONLYチェックに3回失敗したため該当サーバはWriterグループから除外されました。 2019-06-17 10:51:08 MySQL_Monitor.cpp:952:monitor_read_only_thread(): [ERROR] Timeout on read_only check for mysql1:3306 after 0ms. Unable to create a connection. If the server is overload, increase mysql-monitor_connect_timeout. Error: timeout on creating new connection: Can't connect to MySQL server on 'mysql1' (115). 2019-06-17 10:51:08 MySQL_Monitor.cpp:1105:monitor_read_only_thread(): [ERROR] Server mysql1:3306 missed 3 read_only checks. Assuming read_only=1 2019-06-17 10:51:08 [INFO] read_only_action RO=1 phase 1 : Dumping mysql_servers for mysql1:3306 : 2019-06-17 10:51:08 [INFO] read_only_action RO=1 phase 3 : Dumping mysql_servers for mysql1:3306 +--------------+----------+------+-----------+--------+--------+-------------+-----------------+---------------------+---------+----------------+---------+ | hostgroup_id | hostname | port | gtid_port | status | weight | compression | max_connections | max_replication_lag | use_ssl | max_latency_ms | comment | +--------------+----------+------+-----------+--------+--------+-------------+-----------------+---------------------+---------+----------------+---------+ | 1 | mysql1 | 3306 | 0 | ONLINE | 1 | 0 | 1000 | 0 | 0 | 0 | | +--------------+----------+------+-----------+--------+--------+-------------+-----------------+---------------------+---------+----------------+---------+ : +--------------+----------+------+-----------+--------+--------+-------------+-----------------+---------------------+---------+----------------+---------+ | hostgroup_id | hostname | port | gtid_port | weight | status | compression | max_connections | max_replication_lag | use_ssl | max_latency_ms | comment | +--------------+----------+------+-----------+--------+--------+-------------+-----------------+---------------------+---------+----------------+---------+ | 1 | mysql1 | 3306 | 0 | 1 | 0 | 0 | 1000 | 0 | 0 | 0 | | | 1 | mysql3 | 3306 | 0 | 1 | 0 | 0 | 1000 | 0 | 0 | 0 | | | 1 | mysql2 | 3306 | 0 | 1 | 0 | 0 | 1000 | 0 | 0 | 0 | | +--------------+----------+------+-----------+--------+--------+-------------+-----------------+---------------------+---------+----------------+---------+ : # mysql1はOFFLINE HARDのステータスとなりました。OFFLINE HARDのステータスに移行した時点で該当のサーバに対する接続中のセッションは即時切断されます 2019-06-17 10:51:08 MySQL_HostGroups_Manager.cpp:1233:commit(): [WARNING] Removed server at address 140669900746336, hostgroup 0, address mysql1 port 3306. Setting status OFFLINE HARD and immediately dropping all free connections. Used connections will be dropped when trying to use them 2019-06-17 10:51:08 [INFO] Dumping mysql_servers JOIN mysql_servers_incoming +--------------+----------+------+-----------+--------+--------+-------------+-----------------+---------------------+---------+----------------+---------+-----------------+-----------+--------+--------+-------------+-----------------+---------------------+---------+----------------+---------+ | hostgroup_id | hostname | port | gtid_port | weight | status | compression | max_connections | max_replication_lag | use_ssl | max_latency_ms | comment | mem_pointer | gtid_port | weight | status | compression | max_connections | max_replication_lag | use_ssl | max_latency_ms | comment | +--------------+----------+------+-----------+--------+--------+-------------+-----------------+---------------------+---------+----------------+---------+-----------------+-----------+--------+--------+-------------+-----------------+---------------------+---------+----------------+---------+ | 1 | mysql1 | 3306 | 0 | 1 | 1 | 0 | 1000 | 0 | 0 | 0 | | 140669922090560 | 0 | 1 | 0 | 0 | 1000 | 0 | 0 | 0 | | +--------------+----------+------+-----------+--------+--------+-------------+-----------------+---------------------+---------+----------------+---------+-----------------+-----------+--------+--------+-------------+-----------------+---------------------+---------+----------------+---------+ : # READ_ONLYチェックによりmysql2でREAD_ONLY=0となっている事が検出され、Writerに追加されました 2019-06-17 10:51:14 [INFO] read_only_action RO=0 phase 1 : Dumping mysql_servers for mysql2:3306 +--------------+----------+------+-----------+--------+--------+-------------+-----------------+---------------------+---------+----------------+---------+ | hostgroup_id | hostname | port | gtid_port | status | weight | compression | max_connections | max_replication_lag | use_ssl | max_latency_ms | comment | +--------------+----------+------+-----------+--------+--------+-------------+-----------------+---------------------+---------+----------------+---------+ | 1 | mysql2 | 3306 | 0 | ONLINE | 1 | 0 | 1000 | 0 | 0 | 0 | | +--------------+----------+------+-----------+--------+--------+-------------+-----------------+---------------------+---------+----------------+---------+ : 2019-06-17 10:51:14 [INFO] read_only_action RO=0 phase 3 : Dumping mysql_servers for mysql2:3306 +--------------+----------+------+-----------+--------+--------+-------------+-----------------+---------------------+---------+----------------+---------+ | hostgroup_id | hostname | port | gtid_port | status | weight | compression | max_connections | max_replication_lag | use_ssl | max_latency_ms | comment | +--------------+----------+------+-----------+--------+--------+-------------+-----------------+---------------------+---------+----------------+---------+ | 0 | mysql2 | 3306 | 0 | ONLINE | 1 | 0 | 1000 | 0 | 0 | 0 | | | 1 | mysql2 | 3306 | 0 | ONLINE | 1 | 0 | 1000 | 0 | 0 | 0 | | +--------------+----------+------+-----------+--------+--------+-------------+-----------------+---------------------+---------+----------------+---------+ |
なお、ProxySQLには自動リトライ機能が備わっているため、一定数のエラーはProxySQL側で受けてアプリにエラーを返さないという恩恵も受けています。
Writeに関しては候補が無いためエラーとなりましたが、Readについてはmysql1にルーティングされた処理はmysql2, mysql3でリトライされたためエラーが一度も発生しなかったと考えられます。
まとめ
- 今回の検証では正常にフェイルオーバが行われる事が確認できました
- Write処理のエラーについては一定数発生しましたが、10秒程度で復旧が確認できました
- Read処理についてはエラーは返ることはありませんでした
- ProxySQLはリトライ機能やREAD/WRITE分割等、豊富な機能が実装されているため、単純なVIPによる切り替えよりも上手く動作するかもしれません
ぜひ検証にお役立て下さい。


